Setting up Fujifilm X-T3 like a Nikon DSLR
Using my Nikon D7000 is like second nature and all the settings are at my fingertips all the time. Shifting to Fujifilm meant learning all the new menus and settings and practicing till it becomes involuntary. Let me explain how I configured my Fujifilm X-T3 to resemble my Nikon.
CBPHOTOGRAPHY
Siby Koshy
4/21/20233 min read
Using my Nikon D7000 is like second nature and all the settings are at my fingertips all the time. Shifting to Fujifilm meant learning all the new menus and settings and practicing till it becomes involuntary. Let me explain how I configured my Fujifilm X-T3 to resemble my Nikon.
First, we need to make the below one-time changes in the Menu of your Fujifilm Camera:
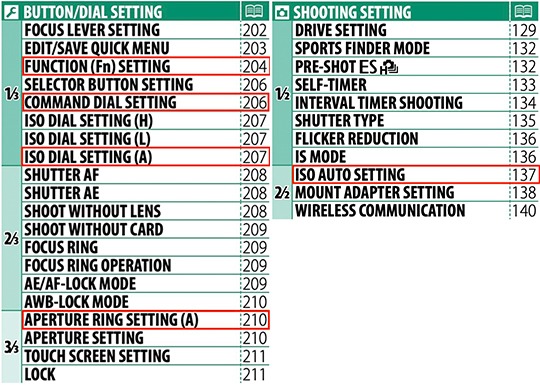
• Menu>Setup>Button/Dial Setting>Command Dial Setting>Set 1 to F, 2 to S.S and 3 to None
• Menu>Setup>Button/Dial Setting>ISO Dial Setting>Set to Command
• Menu>Setup>Button/Dial Setting>Aperture ring setting>Set to Command
Then let’s configure the Auto ISO settings, for this Fujifilm provides three different options where you can individually set the Lowest and Highest ISO limit and the lowest shutter speed or you can set shutter speed to Auto. To configure this, go to Menu>Shooting Setting>ISO Auto Setting, here you will see three Auto options so for each option set Default sensitivity, Max. Sensitivity and Min. Shutter Speed. Now to access these easily set the right selector button under Menu>Setup>Button/Dial Setting>Function (Fn) Setting>Fn5> Set to ISO Auto Setting. Reference photos for menus from X-T3 manual showing the page number of particular setting in the manual:


To better understand how I usually shoot let’s look at how I had my Nikon DSLR setup to my needs and how Fujifilm gets configured after making the above changes to resemble my Nikon settings:
1. NIKON: First preference is to Shoot in Aperture Priority with ISO set to Manual, so in this setting my front command dial sets ISO and back command dial sets Aperture.
FUJIFILM: To put the camera in aperture priority mode set the lens aperture ring to A for lens with aperture ring and for the ones with Aperture switch set switch to A. Then set ISO dial top to A and Shutter Speed dial to A. With this the front command dial will set the aperture and back command dial will set ISO so in reverse to NIKON but still intuitive.
2. NIKON: Second preference is to Shoot in Shutter Priority mode with ISO set to Manual, so in this setting my front command dial sets ISO and back command dial sets shutter speed.
FUJIFILM: To set camera to Shutter Priority mode just change the shutter speed top dial to T and turn the front command dial till the F number colour changes from blue to white on the back display. Now just press the front command dial so it will change from Aperture to Shutter speed. Now front command dial will set shutter speed and back command dial will set the ISO.
3. NIKON: Thirdly shooting in full Manual mode, in this mode front command dial sets Aperture, back command dial sets shutter speed and while pressing the ISO button turn the back dial to set ISO.
FUJIFILM: This is even more intuitive in Fuji as both Aperture and Shutter Speed is set by front command dial by pressing the front command dial it will cycle between Aperture and Shutter speed on each click. ISO is set with the rear command dial as always. In short, the Aperture and Shutter speed are always set on the front command dial based on which mode the camera is in and the rear command dial always sets the ISO.
So only command dials required to set the exposure triangle irrespective of the camera mode. This is much easier to shoot and I got used to it pretty fast and the command dial placements are also very similar to Nikon.
Now let’s look at shooting with Auto ISO, first set the camera ISO dial to A (it should already be in A but still recheck and lock the dial by pressing the button in the center of the dial) and then set ISO in Menu to Auto (Menu>Setup>Button/Dial Setting>ISO Dial Setting>Set to Auto). Now ISO is in auto mode and you can choose between the different Auto modes by pressing the right selector button. Again, much more intuitive than NIKON and to change from Auto to Manual just change the ISO dial Setting back to Command.
With the above it was easy for me to adapt to Fujifilm from Nikon and I was up to speed in a very short time. With all the above I was able to shoot easily without going into menu system for any of my shooting needs except to change from Auto ISO to Manual and vice versa. Please note that the Shutter speed dial, ISO dial and Aperture ring on the lens will override the command dials at any time so ensure these dials are set according to the article for camera to work as explained. Preferably lock both ISO and Shutter speed dials once you set it to avoid accidental changes.
Hope this was helpful for first time Fujifilm users migrating from Nikon. The next big change was shooting with EVF which is a real game changer and my next article will detail my experience with it so keep checking...
Contact: sibykdxb@gmail.com
Copyright © All rights reserved.
